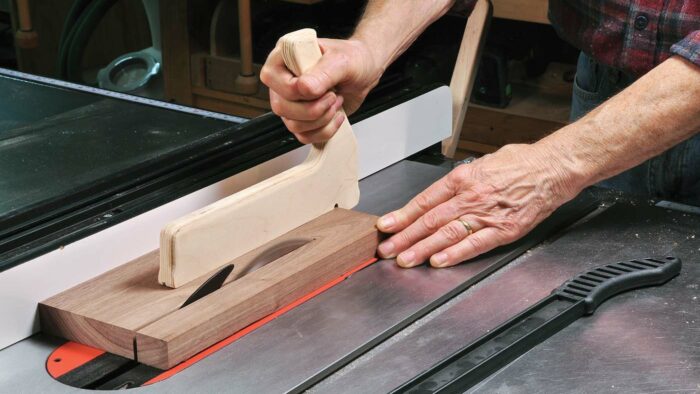
Most severe table-saw injuries are caused by kickback. The main solution for it is using a splitter behind the blade. And the best type of splitter is a riving knife. There’s more to the story, but those are the headlines.
 The physics of kickback: Without a splitter in place, the opposition of the feed force and the resistance of the blade can cause the workpiece to pivot away from the rip fence and contact the teeth at the rear of the blade, causing it to snap back violently toward the user. Let’s start by defining what kickback is and why it’s so dangerous. When you cut a board on the table saw, the teeth at the front of the blade are supposed to do all of the cutting. Those are spinning down toward the table, so they push the board in the same direction, with the table acting as the control surface. Kickback occurs when wood encounters the teeth at the back of blade, which are spinning upward, propelling the board toward the user. There are multiple ways kickback can be triggered, but the motion and the danger are the same. If the rear teeth grab the wood firmly enough, they can lift the wood off the table, propelling it toward the operator with significant force. The process happens so suddenly that the user lacks the time needed to release their grip, which means that their hand can be drawn into the blade. The projectile can also strike the user with catastrophic force. |
What is kickback?The most common cause of kickback is the workpiece wandering away from the rip fence and contacting the back of the blade, which is spinning toward the user. The piece then jams between the blade and the fence, causing it to pick up speed as it rotates back toward the user. All of this happens in milliseconds. |
SawStop technology is a secondary measure
You’ve likely heard lots about SawStop’s revolutionary table-saw safety technology, which senses blade-to-skin contact and then stops and drops the blade just a few milliseconds later. This happens so fast that the worst possible accident is a scratch—fixable with an adhesive bandage. Although this exciting technology deserves all of the headlines and sales it has generated, it’s not the most important safety feature on a modern table saw. That distinction goes to the riving knife, a relatively new form of blade splitter. (Keep reading to learn about the differences between a traditional splitter and a riving knife.)
Early in SawStop’s history I had a chat with its inventor, Stephen Gass, who had discovered two important things in his research. First, 60 percent of hand injuries are precipitated by kickback. Second, a riving knife virtually eliminates kickback.
While kickback is the main reason for hand-to-blade accidents, it’s not the only one. Fingers can stray into the blade during a moment of inattention. You might push a board without noticing where your hand is exactly, or forget where the blade will emerge from the back of a table-saw sled, and so on. For those types of situations, as well as kickback, SawStop technology is an undeniable blessing.
An effective solution
|
The trouble with traditional splitters
Riving knives are relative newcomers to the U.S. table-saw market, required by a 2012 law that covered all new saws manufactured after that point. Before 2012 we had a less effective type of splitter, which was so inconvenient that most users removed theirs permanently. And with no splitter sitting in the kerf, kickback was rampant, giving woodworking a well-earned reputation for scary injuries and missing fingers.
When you hear about terrible table-saw accidents, you are very likely hearing about a saw that was used without a splitter. But it’s hard to blame woodworkers for discarding those old, inconvenient splitters.
First, traditional splitters stood tall behind the blade, so they only worked on cuts that went all the way through the board. If you were cutting a slot in the bottom of a workpiece, it would stop dead when it hit the splitter. Even worse, old-school splitters were tedious to remove and replace. So off they came, coming to rest in a dark corner of the shop, never to be seen again.
Enter the riving knife
Long mandated in Europe, which tends to have stricter worker-safety laws than the United States, a riving knife is a vastly improved type of splitter, one that is far more likely to stay on the saw and more likely to prevent kickback. Attached to the saw’s trunnions, a riving knife moves up and down as the blade height is adjusted. This keeps it at the same distance from the back of the blade throughout its vertical travel; that tight gap is very helpful for preventing kickback.
Riving knives are available in two configurations. The most useful version looks like a shark fin. It can’t hold a blade cover, but it offers a critical benefit in return. This low-profile version sits just lower than the top of the blade, and it maintains that relationship as the blade is raised and lowered. It also tilts with the blade for bevel cuts. This means it can stay in place for slotting cuts and almost every other type of cut. The main exception is cuts made with a stack of dado blades. When you do need to remove the riving knife, it goes off and on in seconds. So you really have no excuse not to use it.
Remember that kickback is the primary cause of table-saw accidents, but a properly used riving knife will prevent it. Do that and you can relax at the table saw, leaving you free to focus on keeping your hands safe and clear of the blade.
Other safety problems are just as easy to solveStaying out of harm’s way requires more than riving knives and flesh-sensing technology. The most important practice is to stay in the moment. While you’re working with a spinning blade, don’t let your mind drift to the glue-up that’s coming next. It’s critical to stay focused on where your hands are and what’s happening with the wood. Similarly, don’t use any power tools when you are tired or distracted. It’s also essential that the blade be parallel to the miter slots and rip fence, and for the riving knife to be properly aligned. If you’ve checked those boxes, you’re ready to read on. Mill boards before ripping them
Most kickback occurrences can be traced back to problems that were present before the wood hit the blade. One typical mistake is trying to rip warped or otherwise rough lumber that hasn’t yet been milled flat and straight. You need to mill at least one face and one edge flat (left) before ripping the board. Those surfaces go against the saw table and rip fence, ensuring that the board moves in a straight line through the blade. Rip a crooked or warped board on the table saw, and it will rock and twist as you push it, potentially pivoting onto the back of the blade. Don’t rip wide boards down the middle
Another common mistake is using the table saw to rip wide boards down the middle. The drying process often creates internal stresses in boards. When those boards are ripped down the middle, such stresses can cause the two halves to pinch together behind the blade. On the table saw, this can cause kickback. On the bandsaw, however, with its narrow blade, the pinching is not a problem. This is why wide boards should be ripped to rough size on the bandsaw before being taken to the table saw and brought down to final size. If the boards pinch, twist, or warp significantly on the bandsaw, that’s a sign they might be better suited for kindling than woodworking. Extremely stressed wood is called “reaction wood,” and the telltale signs are grain runout, grain switchback, loose knots, cracks, and splits. If you see those signs, proceed with caution. Loose knots can also turn into projectiles on the table saw. Usually I cut them away during the milling process, but if I want them in my design, I secure them with CA glue or slightly thinned hide glue before milling the wood. Use the right push sticks
When ripping, always control the piece trapped between the blade and the fence. If the rip cut is 6 in. or wider, I use my hands to push the piece through. On anything narrower, I use a push stick to make sure my hands stay well clear of the blade. The right type of push stick has a long section that rides on top of the board, helping you press it down and steer it, and a hook at the back for pushing. The plastic push sticks included with most table saws don’t make the grade. These have a small bird’s-mouth at the end of a long handle, which only serves to push the board, not hold it down or steer it. Move that stick over to your bandsaw, where it will work just fine. Don’t use the rip fence for crosscutting
The rip fence is not a crosscut stopWhen crosscutting boards with a sled or miter gauge, don’t use the rip fence as a work stop (above left). The drag of the fence will want to pivot the board, causing it to jam between the blade and fence, potentially turning it into a projectile— heading right at you. A safer solution is to clamp a spacer block to the rip fence well ahead of the blade (above right). Bump the workpiece against it, and push the piece forward into the blade. It will be well past the block when the cut is made, with the necessary clearance to avoid jamming (right). Even better, when possible, is to clamp a stop to the miter-gauge fence or crosscut sled itself and move the rip fence out of the way altogether. |
-Roland Johnson is a contributing editor.
Photos: Asa Christiana. Drawing: Derek Lavoie.
| From Fine Woodworking #315
To view the entire article, please click the View PDF button below. |
 |
Fine Woodworking Recommended Products

Rockler Dust Right 1250 CFM
You’ll need help to get this heavy unit onto its bracket, but if you’re looking for a central dust collector that won’t gobble floor space, this may be the unit for you.

Veritas Precision Square
This precision square is incredibly versatile, from checking squareness to dialing in machine setups.

DeWalt 735X Planer
At high speed, the planer works fast and leaves a smooth surface. But the slower, finish speed produces an almost glass-smooth surface. Knife changes are easy.
Sign up for eletters today and get the latest techniques and how-to from Fine Woodworking, plus special offers.
Download FREE PDF
when you enter your email address below.
View PDF


