When considering veneer and its quality, we usually think only of characteristics such as species, thickness and figure, or defects such as knots, stain or pitch streaks. Beyond that, veneer is veneer. But of most serious concern should be knife checks. These are parallel-to-grain fracture planes produced in the veneer at the time of its manufacture and which may go unnoticed, only to cause agonizing problems later. Because they are probably the most common cause of checks in the finished surfaces of veneered work, the woodworker should understand what these knife checks are, how they are formed, how to detect them and how to cope with them.
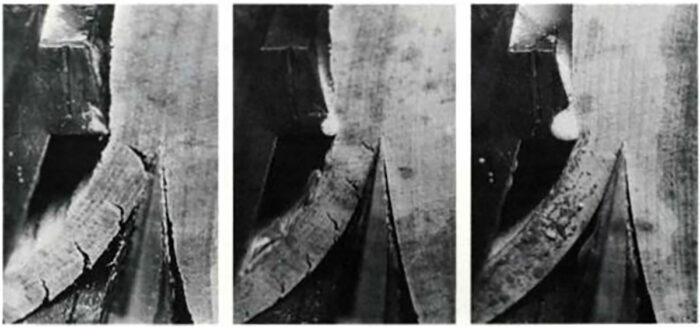
Sawn veneer does not have these checks, but today most veneer is knife-cut by peeling (rotary cutting) or slicing. In either method, the basic cutting action is similar. A knife sharpened to an angle approaching 0º would distort the wood structure the least, but would, of course, break too easily. Veneer-cutting knives are therefore sharpened to an angle of about 21º—a compromise between a small angle that would minimize distortion of the wood structure and a blunt angle that would minimize knife breakage. This means that as the knife separates the veneer from the flitch, the separated layer of wood is severely bent, and stresses build up in the region near the knife edge. When the strength of the wood is exceeded, the stress is relieved by failure, and the plane of fai·lure thus formed is called a knife check, or lathe check. This bending and breaking cycle is repeated as cutting continues, so each layer of veneer has checks at fairly regular intervals.
The side of the veneer that was against the knife and has knife checks penetrating into its surface is called the loose side, or open face. The other side is called the tight side, or closed face.
To prevent knife checks, lathes and slicers are equipped with a pressure bar or nosebar, a solid bar or roller that bears against the veneer as it is being cut. Its pressure holds the cell structure together in the region where checks usually develop. Too much pressure crushes the cell structure of the veneer, so there is a theoretical optimum opening between the knife and the pressure bar that produces the highest-quality veneer. Experience has shown that checks can be minimized or eliminated when the distance between the pressure bar and the knife is 80% to 90% of the thickness of the cut.
The terms tightness and looseness refer to the relative depth of knife checks. In producing veneer without nosebar pressure, tightness is improved by cutting lower-density species of wood, by heating the wood, and by thin cuts.
Anatomical features of the species being cut are also related to checking. If structural planes of weakness-such as the large rays of oak or the earlywood layer in ring-porous hardwoods- coincide with the probable plane of check formation, the checks will be worse. Diffuse-porous hardwoods with fine, well-distributed rays are more likely to yield tight, uniform veneer.
The tightness of veneer can be assessed in a number of ways. Surface roughness or corrugation (especially of the loose side) is commonly associated with checking. Veneer having any suggestion of a washboard surface is probably loosely cut.
Manually flexing the veneer will help you see the checks. In addition, the veneer will feel stiffer when flexed to close the checks, but will feel more limp when the checks are flexed open. Tightly cut veneer will flex about as easily both ways, so if you can’t tell, it’s probably cut well.
In some woodworking applications, it is critical to know the actual depth of the checks. This can be determined by staining with an alcohol or spirit solution of dye such as machinists’ layout dye, then beveling the veneer. Cut sample strips of veneer from the ends of sheets and stain them liberally on both sides, keeping the stain away from end grain. Allow to dry thoroughly, then glue or cement the veneer onto blocks of scrap wood. When the glue is set, bevel the veneer with a fine sander disc, or with a sharp chisel or knife. The relative depth of the checks will be apparent across the bevel .
The consequences of knife checks should be quite obvious. The most common problem is parallel-to-grain cracks in the finish on veneered surfaces—nearly always traceable to knife checks.
This problem is especially aggravating because it is usually a delayed reaction, appearing months or years after the piece is finished. A surface may be flawless at completion, but the normal shrinking and swelling of the wood in response to seasonal humidity fluctuation cause hidden knife checks to migrate to the surface and through the finish itself. This problem is second only to delamination as a cause of the bad reputation veneered products have undeservedly acquired. One frequently sees it when softwood structural plywood such as Douglas fir is used for finished or painted surfaces. Structural plywood is designed to carry stresses parallel to the grain direction of its plies, and this capability is little affected by knife checks. Apparently, little serious effort is made to control tightness of veneer in manufacturing commercial softwood plywood. Plywood manufactured with surfaces of medium or high-density impregnated paper overlay (designated MDO and HDO ) is best where smooth painted surfaces are needed. Large lumber yards usually stock MDO plywood, which is routinely used for outdoor signs and similar products.
End-grain plywood surfaces may also reveal finish defects caused by knife checks. This is especially common when moisture loss results in excessive shrinkage stress .
Another visual effect of knife checks is bleed-through of glue, which shows up as a series of evenly spaced lines on the veneered surface. This is especially apparent in light-colored woods such as maple or birch sapwood.
In woodworking, veneer should routinely be inspected for tightness. Checks penetrating no more than 2 5 % of the thickness of the veneer can be tolerated under most circumstances. When laying up veneer, spread the loose side with glue. With luck, the glue will penetrate the checks and perhaps glue them closed. It may help to lay the veneer over a slightly convex surface so the checks will be open to the glue. (This will also ensure that the tight side is the exposed face on surface plies. ) Care must then be taken not to sand through the tight side of the veneer. I have seen countless situations where veneer surfaces have been sanded right down to expose the knife checks and the glue in them.
Bookmatched surfaces are a predicament, because the veneers must be placed with alternate open and closed faces up. In such cases, it is important to have relatively tight veneer to ensure uniformity. You may have seen bookmatched patterns in which the finish quality alternated with each piece of veneer, a consequence of knife checks.
Lathe-check troubles are not limited to visual surface effects. Critical mechanical problems may also result. Most typical is some form of rolling shear developed when plywood is stressed in the form of a beam over a short span, so that high levels of horizontal shear are developed. If the shear coincides with the direction of stress that opens the checks, rolling shear failure may result. The edges of plywood panels ” broomed” over in this manner are often misinterpreted as “delamination, ” which erroneously implies glue failure.
I do not have any specific recommendations for finishing veneer that has knife checks. I think a finish that would provide the best moisture barrier and thus reduce dimensional variation would be best. Also, if the checks were on the surface, any finish that would seal them shut would help. A finish like linseed oil would have little to offer. A low-viscosity lacquer or varnish in multiple coats might work best.
On the whole, most hardwood cabinet veneer produced by reputable mills is cut with adequate production quality control to ensure reasonable tightness. But beware of ” clearance” sales or “closeouts, ” because loose veneer is hardly a bargain at any price. The best guideline is to buy veneer from reputable dealers and know how to detect, and cope with, the occasional loose veneer.
To view the entire article, please click the View PDF button below.
Fine Woodworking Recommended Products

Whiteside 9500 Solid Brass Router Inlay Router Bit Set
Set includes solid carbide down-cut spiral bit (for chip-free cutting), quick-change bushing, template guide and complete instructions. Fits Porter-Cable, Black & Decker and any router with a Porter-Cable bushing adapter.

Bahco 6-Inch Card Scraper
The size and thickness are what matter here. A consistent performer, this Bahco scraper is found in many shops we visit.
Sign up for eletters today and get the latest techniques and how-to from Fine Woodworking, plus special offers.
Download FREE PDF
when you enter your email address below.
View PDF
